The Kitchen That Looked Acceptable Until It Was Used Every Day
When James first stood in this kitchen, nothing felt wrong. The cabinets were painted a muted blue that felt calm and safe, the appliances were functional, and the room carried that familiar promise of a space that had already been updated once and therefore didn’t demand attention. But kitchens are not static rooms. They reveal…
When James first stood in this kitchen, nothing felt wrong.
The cabinets were painted a muted blue that felt calm and safe, the appliances were functional, and the room carried that familiar promise of a space that had already been updated once and therefore didn’t demand attention.
But kitchens are not static rooms. They reveal themselves slowly, through repetition.
Within the first few weeks of cooking regular meals, small frustrations began stacking up, not dramatically, but persistently.
The kind of problems you only notice when you are tired, hungry, and standing in the same spot night after night.
The Stovetop That Never Quite Worked the Same Way Twice
The first issue James noticed was the stovetop, an older electric coil unit that looked serviceable but behaved unpredictably.
The front-right burner heated aggressively, often scorching pans if left unattended for even a minute, while the back-left burner struggled to maintain a steady simmer.
Recipes that required consistent heat became exercises in constant adjustment.
James rotated pots mid-cook, sliding pans half on and half off burners just to control temperature, which is never how cooking should feel.
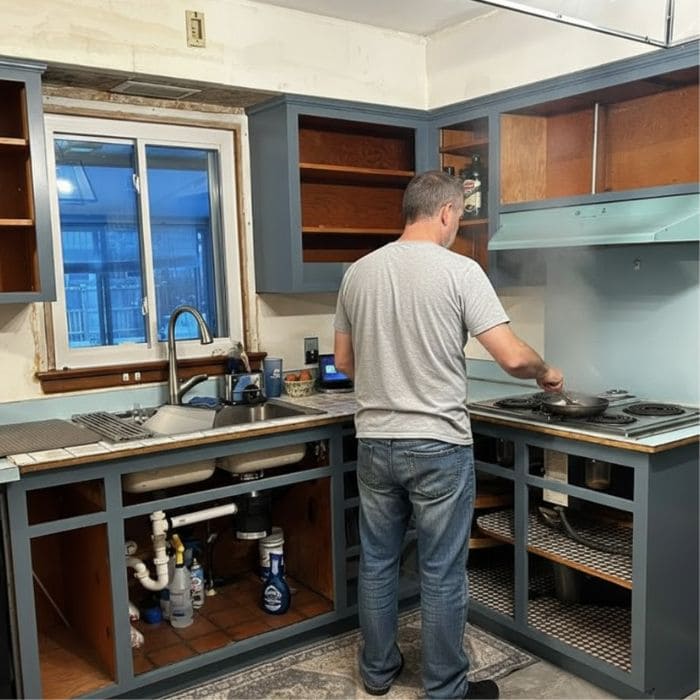
The placement made things worse. The stovetop had been installed nearly an inch too far back, pushing it closer to the wall than recommended.
This meant that reaching across hot coils to stir or season food felt awkward and unsafe, especially when using larger pans.
Steam and grease had nowhere to go, creeping forward instead of being pulled into the hood.
When James measured it later, the clearance behind the unit was just under three-quarters of an inch, far less than current guidelines suggest.
That gap explained the constant buildup of residue along the back edge, an impossible-to-clean strip where crumbs, grease, and dust collected no matter how often it was wiped.
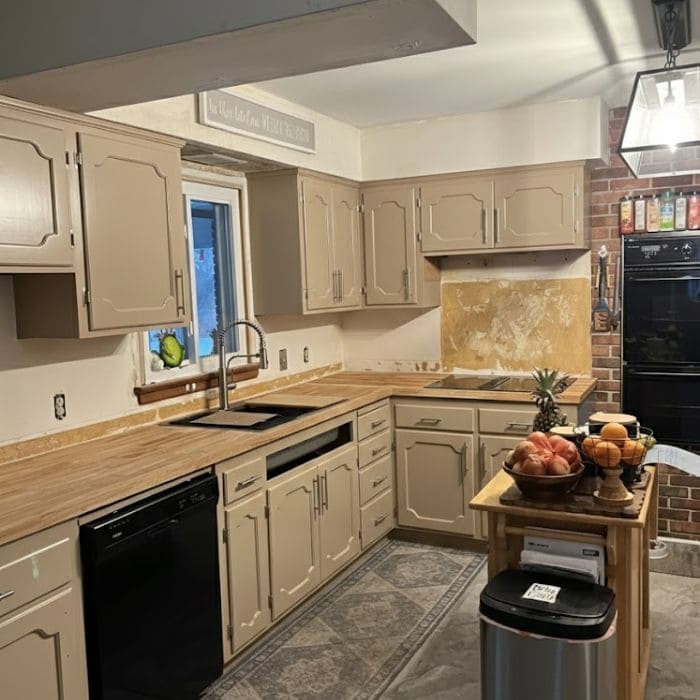
What Was Hidden Under the Countertop

Once the decision was made to address the stovetop, James knew there was no way to fix just that one issue.
The power was shut off at the breaker, verified with a non-contact voltage tester, and the stovetop lifted out easily enough, but what sat beneath it told a different story.
The countertop opening had been cut roughly, with uneven edges and unsupported spans.
Also, the particle board beneath showed signs of heat stress, slight warping, and darkened areas where moisture had been trapped over time.
The wiring was functional but outdated, loosely stapled rather than properly secured, and routed in a way that made future maintenance unnecessarily difficult.
Nothing was immediately dangerous, but everything suggested shortcuts had been taken years earlier.
That was the moment James stopped thinking of this as a surface update and started treating it as a correction.
The Cabinets That Looked Better Than They Functioned
At first glance, the blue cabinets were one of the kitchen’s strongest features. But living with them revealed issues that photos never show.
Several cabinet doors were slightly out of square, by as much as a quarter inch in some cases, which caused uneven gaps that the eye kept returning to.
Hinges had been adjusted repeatedly over the years, stripping some screw holes and making doors sag just enough to feel sloppy when opened.
Inside the sink cabinet, there was no backing panel at all. Exposed plumbing snaked across the space, limiting storage and making it impossible to fully organize the area.
Cleaning supplies had to be arranged around pipes, and any small leak or drip immediately soaked into unfinished wood.
When the doors came off for repainting, James labeled each hinge and screw, discovering that not a single cabinet was exactly the same.
Some frames were shimmed with paint stirrers, others with thin scraps of plywood, evidence of a previous install that prioritized speed over precision.
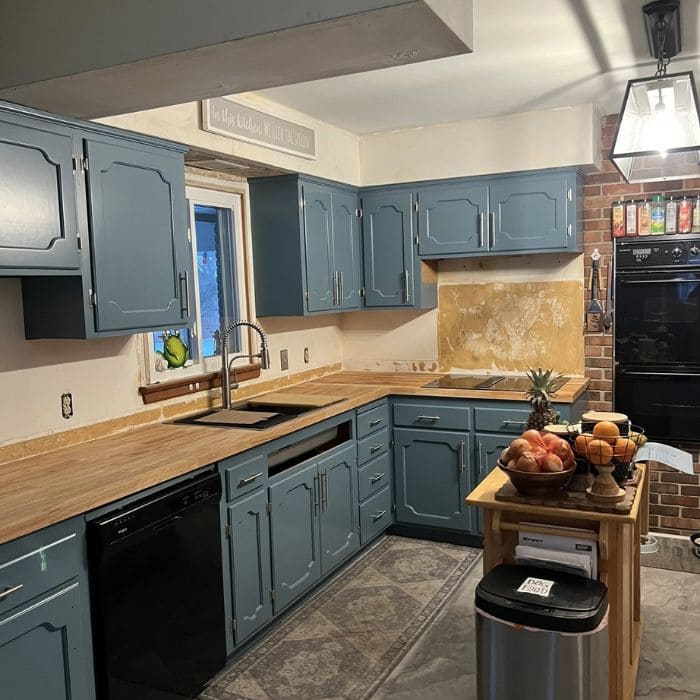
The Decision to Change the Color and Why It Was Necessary
The blue paint itself wasn’t the problem. The way it interacted with the room was.
This kitchen relied heavily on a single window for natural light, and the darker cabinet color absorbed more than it reflected.
During winter afternoons, the corners of the room felt dim even with overhead lights on. James noticed that he avoided certain work areas simply because they felt less inviting.
Before committing to a new color, several samples were tested directly on cabinet doors, left in place for days to see how they behaved under morning light, afternoon shadows, and artificial lighting at night.
Eventually, the choice leaned toward a lighter, warmer beige tone that still felt grounded but allowed light to move through the space more freely.
The Real Work of Repainting Cabinets Properly
Each cabinet door was removed, lightly sanded with 220-grit paper to dull the existing finish, then cleaned thoroughly with a degreaser to remove years of cooking residue.
A bonding primer was applied to prevent bleed-through and ensure adhesion, especially on edges where previous paint had worn thin.
Instead of one heavy coat, two thin coats were applied with a foam roller and brush combination, allowing proper drying time between layers.
It took longer, but the finish leveled better, with fewer brush marks and a more durable surface.
Inside the cabinets, raw wood areas were sealed, and proper backing panels were installed where none had existed before. This alone transformed how usable the storage felt.
Rebuilding the Counter and Installing the New Stovetop
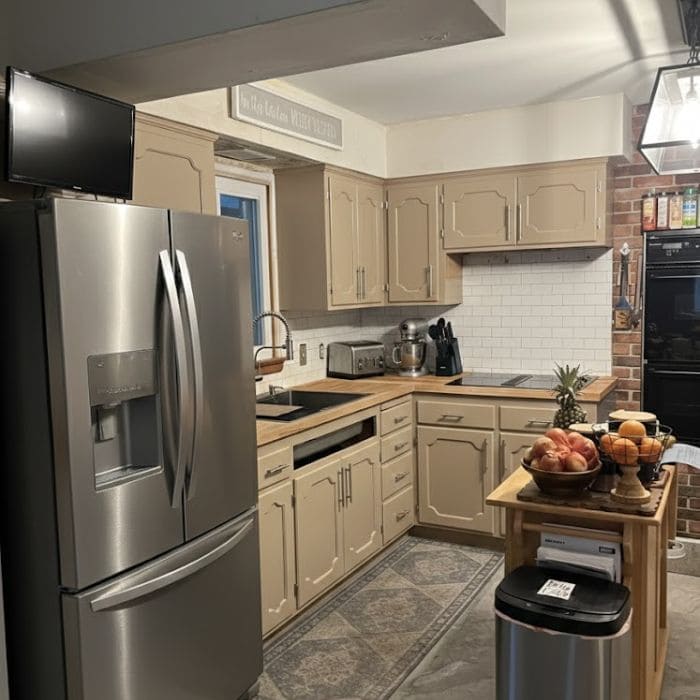
The countertop opening was rebuilt with solid support, using properly sized lumber rather than makeshift shims. Everything was checked for level and square before the new stovetop was installed.
The new unit sat flush, centered correctly, and immediately changed how cooking felt.
Heat distribution was even, controls were responsive, and the simple act of stirring a pot no longer required awkward body positioning.
The wiring was updated, secured cleanly, and routed in a way that future repairs wouldn’t require dismantling half the cabinet.
What the Finished Kitchen Gave Back
Wow, cooking became intuitive again, and cleaning took less time. Light filled the room differently, softening edges and making the space feel larger without changing its footprint.
Most importantly, the kitchen stopped asking for attention.
James still keeps the before photos, not as a reminder of something ugly, but as proof that livable problems often hide behind good enough.
This renovation was about listening to daily friction and choosing to fix it properly, even when the issues weren’t obvious at first glance.